The Retail Settings page contains dispensing fee settings, entity setups, and parent-child relationships.
Dispensing Fee Schedule
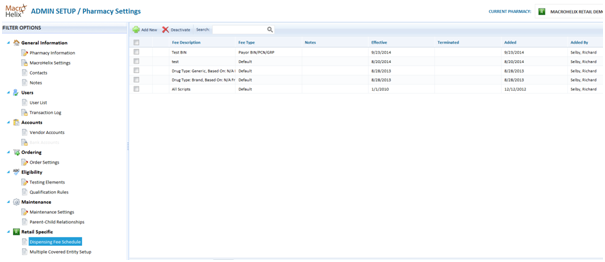
The Dispensing Fee Schedule displays all the dispensing fees configured for your retail site. You may have multiple fees and types, each with different rules.
To view the Dispensing Fee Schedule:
1. Hover over ADMIN SETUP and select Pharmacy Settings.
2. In the left pane under FILTER OPTIONS, under Retail Specific, click Dispensing Fee Schedule.
In the right pane, the dispensing fee schedule appears.
3. For descriptions of the information on the Dispensing Fee Schedule page, see the table below.

Field |
Description |
| Fee Description | You can have multiple dispensing fees based on the fee type and fee. For each fee, select a type and complete the rest of the fields on the screen. In the Fee Description field, enter a description. |
Fee Type |
An assigned value for this fee type. This may be Generic or Brand or packaged. |
Notes |
Any additional information you want to enter about this fee type and schedule. |
Effective |
Date the schedule for this fee type is effective. |
Terminated |
Date the schedule for this fee type ends. |
Added |
System-generated date of when the fee schedule was added. |
Added By |
System-generated with the name of the person who added the fee schedule. |
Adding a New Dispensing Fee Schedule
You can set up multiple rules for different PIDs.
To add a new dispensing fee schedule,
1. In the menu bar, click Add New.
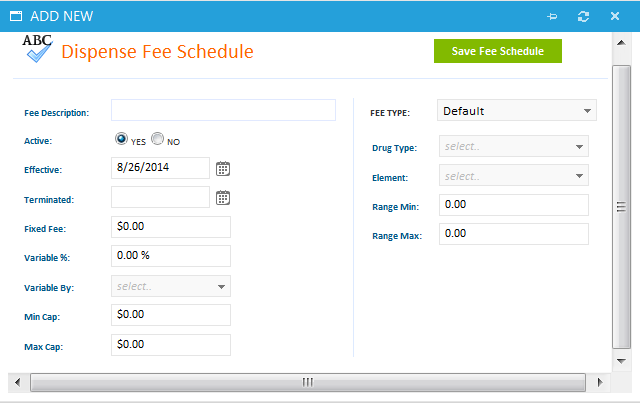
The ADD NEW Dispense Fee Schedule window opens.

2. Complete the fields on the screen using the information in the table below, and click Save Fee Schedule.
Field |
Description |
| Fee Description | Enter a description for this fee, such as Drug Type: Generic or Drug Type: Brand. |
Active |
Select one of the following: Yes - this fee is active in 340B Architect. No - this fee is not active in 340B Architect |
Effective |
The date this dispensing fee is effective. Click the calendar icon and select a date. The default date is today's date. |
Terminated |
The date this dispensing fee is no longer effective. Click the calendar icon and select a date or leave this field blank if you do not know when the termination date will be effective. |
Fixed Fee |
The dispensing fee that will be charged. Enter a dollar and cents amount. |
Variable % |
Percentage of the element that will be taken into consideration. Elements are Days Supply, Revenue, Revenue-Drug Cost. |
Variable By |
Elements that are used to create the type of fee, such as revenue. You can pick different values to apply to each dispensing fee. Click the drop-down arrow and select one of the following: N/A - not applicable. Days Supply - Revenue - Revenue - Drug Cost - |
Min Cap |
The minimum after applying percentages. |
Max Cap |
The maximum after applying percentages. |
FEE TYPE |
NOTE: Depending on the type you select here, the boxes below change. These all determine what is tested. Click the drop-down arrow and select one of the following: Default - NDC - Payor Code - Payor BIN/PCN/GRP - Med Express |
Drug Type |
Click the drop-down arrow and select one of the following: N/A - Not applicable Brand - Brand name drug Generic - Generic drug Special - special drug |
Element |
N/A - Not applicable Days Supply - Revenue - the actual price minus any discount. Packages - number of packages of the script |
Range Min |
This is the range you set for the pharmacy. Any patient who brings in a script, the script will have these rules applied to it including the minimum and maximum the payor must pay. The range is set up for each fee type (such as NDC or Payor). |
Range Max |
See Min. |
Multiple Covered Entity Setup
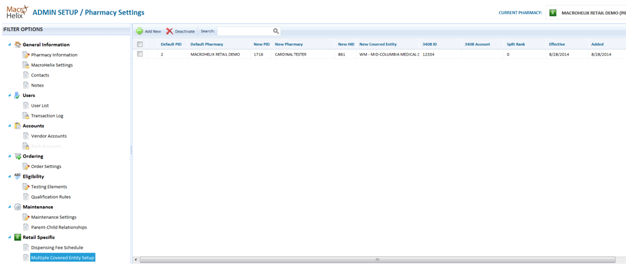
Contract pharmacies can be contracted with more than one covered entity. Multiple covered entity setup enables you to set order ranking.
To view the Multiple Covered Entity Setup page:
1. Hover over ADMIN SETUP and select Pharmacy Settings.
2. In the left pane under FILTER OPTIONS, under Retail Specific, click Multiple Covered Entity Setup.
In the right pane, the any multiple covered entity setups appear.

To add a new multiple covered entity:
1. In the menu bar, click Add New.
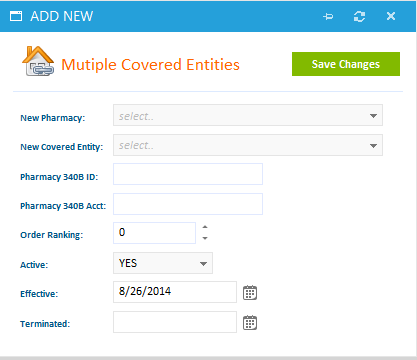
The ADD. NEW Multiple Covered Entities window opens.

2. Complete the fields in the window using the information in the table below, and click Save Changes.
Field |
Description |
New Pharmacy |
Click and select from the list of available PIDs associated with the hospital. |
New Covered Entity |
Click the drop-down arrow and select the covered entity. |
Pharmacy 340B ID |
Enter the pharmacy's 340B ID number. |
Pharmacy 340B Acct |
Enter the pharmacy's 340B account number. |
Order Ranking |
Click the up arrow until you reach the number of the ranking you want to associate with this pharmacy. |
Active |
Click the drop-down and select one of the following: Yes - No - |
Effective |
Click the calendar icon and select the date on which this pharmacy/entity relationship is to become effective. The default date is today's date. |
Terminated |
The date on which this pharmacy/entity relationship will terminate. Leave this field blank if you do not know the termination date. |

